
4 in Starter Kit Installation Guides
4 in Starter Kit Installation Guides
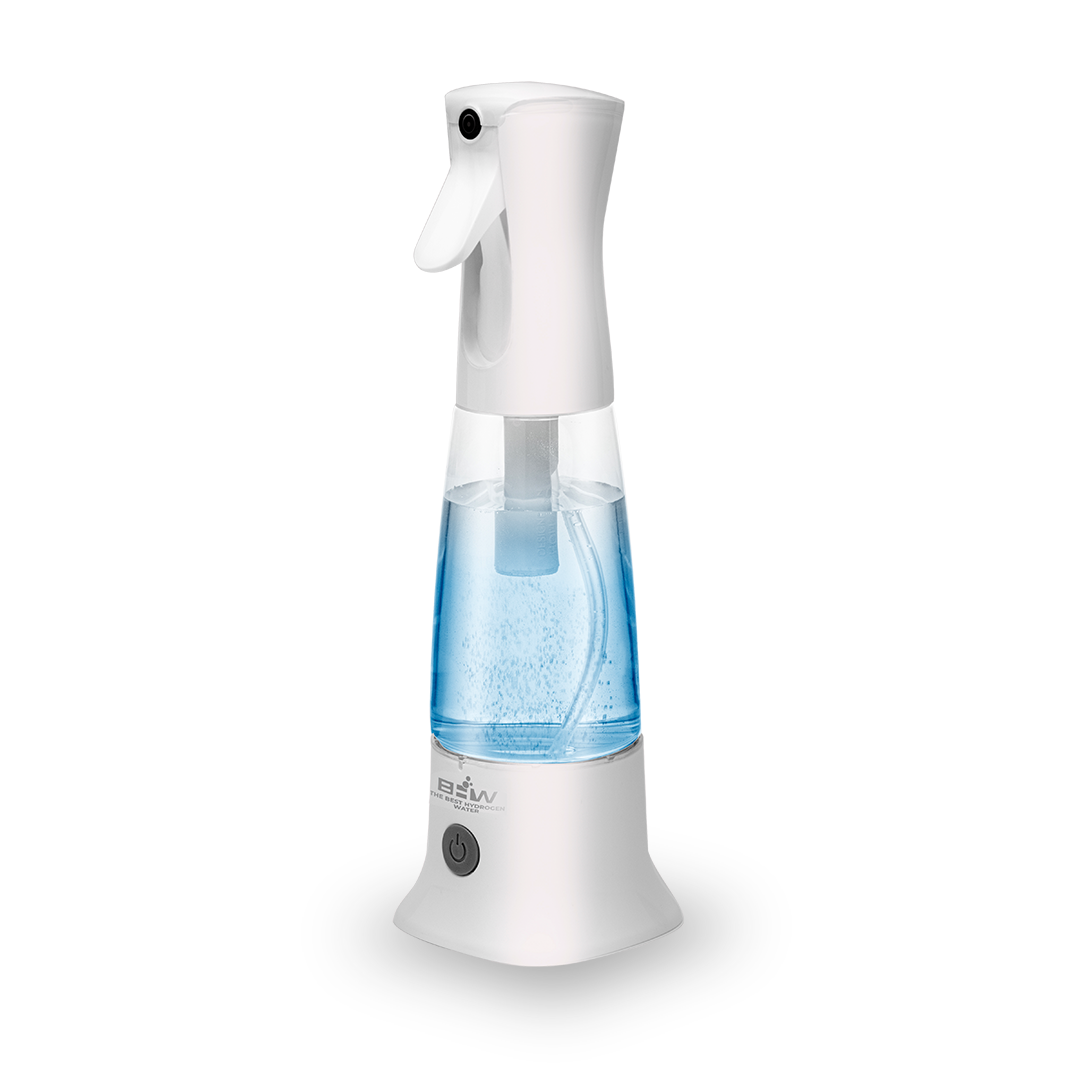
How to Use the Disinfectant Spray with Hypochlorous Acid
The following step-by-step instructions will guide you through the process of using your disinfectant spray effectively to ensure proper sanitization around your environment.
Initial Setup and Preparation
1. Unpack and Charge
Remove the disinfectant spray from the box.
Use the charger provided to charge the unit for at least 3 hours.
2. Rinse Before Use
Take off the cap of the disinfectant spray.
Rinse the spray tank with water several times, ensuring the base does not come into contact with water.
Mixing the Disinfectant Solution
3. Fill with Water
Fill the tank up to approximately 80% full with any source of water; distilled water is not necessary.
4. Add Salt
With the help of the included teaspoon measurement and funnel, add 1 teaspoon (or as instructed) of fine ground table salt to the water in the tank.
5. Start the Reaction
Secure the lid onto the tank.
Press and hold the start button until the unit turns on.
Allow it to run its complete 5-minute cycle to generate the hypochlorous acid solution.
Using the Disinfectant Spray
6. Using the Disinfectant Spray
Once the cycle is finished, the disinfectant spray is ready to be used.
For best results, use the disinfectant spray immediately after the cycle completes.
Post-Use and Maintenance
7. Dispose of Remaining Solution
After using the disinfectant spray, pour any leftover hypochlorous acid solution down the drain.
8. Clean the Bottle
Rinse the inside of the spray bottle with water.
Allow the bottle to completely dry before storing it away.
Important Safety Information
Caution: Hypochlorous acid is not intended for ingestion.
Storage: Keep the disinfectant spray stored in a cool, dry place away from direct sunlight.
Suggested Uses
The disinfectant spray with hypochlorous acid can be effectively used on various surfaces for sanitation purposes - By following these clear and concise steps, you'll ensure that your disinfectant spray is used safely and effectively to maintain cleanliness and hygiene in your space.
How To Use The Hydra-Shot With An Inhalation Cannula
Harnessing the power of hydrogen for your well-being can be both refreshing and beneficial. The Hydra-Shot with its unique inhalation system is designed to deliver hydrogen gas through a cannula. Follow these step-by-step instructions to begin your inhalation therapy session.
Step-by-Step Instructions
Starting Up Your Hydra-Shot
Begin with the Start-Up Process: Follow the Hydra-Shot's start-up instructions carefully to ensure your device is ready for use.
Preparing the Device for Inhalation
Attach the Inhalation Lid: Locate the specialized lid designed for inhalation in your 4-in-1 starter pack, and place it aside for later use.
Fill with Distilled Water: Fill your Hydra-Shot tank to about 80% with distilled water to prevent potential leaking.
Secure the Lid: Carefully align and screw on the inhalation lid onto the Hydra-Shot body, ensuring a tight and secure fit.
Setting Up the Inhalation Cannula
Prepare the Cannula: Unpack your inhalation cannula from the starter pack. Fit it securely around your nose and over your ears for comfort.
Connect the Cannula to the Lid: Attach the end of the cannula to the inhalation lid's hydrogen gas port by pressing down to create a good seal.
Commencing Inhalation
Get Comfortable: Find a pleasant and relaxing place to sit as you prepare for your inhalation session.
Start the Device: Activate your Hydra-Shot by holding down the start button for 3 to 5 seconds, then release it and tap the button once quickly for a 5-minute cycle or twice for a 10-minute cycle.
Continuing or Finishing Your Session
Complete A Cycle: After a 10-minute cycle, you have the option to begin another session immediately. For extended exposure, you may add an additional 5 or 10-minute cycle.
Optimizing Inhalation
Adjusting the Cannula Tube: Optionally, you can shorten the cannula tube to reduce the distance the gas needs to travel, potentially enhancing the flow.
Ensuring A Secure Lid: Double-check that the inhalation lid is tightly fastened before each use.
Regular Usage: For optimal results, it's recommended to use the Hydra-Shot several times a week or as needed.
Cleaning the Cannula: Clean the cannula after use with the disinfectant spray from your starter pack, and allow it to dry before the next usage.
Confirming Gas Production: If unsure about gas production, submerge the cannula end in water and look for bubble formation. It's normal for bubbles to emerge from only one side.
Breathing Technique: For best results, inhale deeply through your nose and exhale through your mouth during your session.
Final Tips
The benefits of hydrogen inhalation therapy vary among individuals. Regular and consistent use is key to noticing its potential effects.
Maintenance of your Hydra-Shot device is crucial. Follow the manufacturer's guidelines for care and storage.
Should you encounter any issues with your device, promptly consult the troubleshooting section of your user manual or contact customer service.
Enjoy the unique experience of hydrogen inhalation therapy with your Hydra-Shot and inhale your way to a more balanced life.
How to Use Goggles with the Hydra-Shot from the 4 in One Starter Pack
Transform your eye wellness routine with the innovative Hydra-Shot and its compatibility with specialized goggles found in the 4 in One Starter Pack. Follow this concise guide to use the Hydra-Shot with the inhalation cannula for eye health, and tap into the benefits of hydrogen water right from the comfort of your home.
Step-by-Step Instructions
Step One: Start-Up Process
Begin by reviewing the instructions provided with your Hydra-Shot to initiate the start-up process. Carefully follow the guidelines to ensure the device is ready for operation.
Step Two: Preparing the Hydra-Shot
Switch out the standard lid for the specialized inhalation lid included with your pack. Fill up the Hydra-Shot tank to approximately 80% capacity with distilled water, avoiding overfilling to prevent any leakage.
Step Three: Securing the Inhalation Lid
Affix the inhalation lid onto the Hydra-Shot body, making sure to tighten it securely. The lid should screw on tightly without any misalignment.
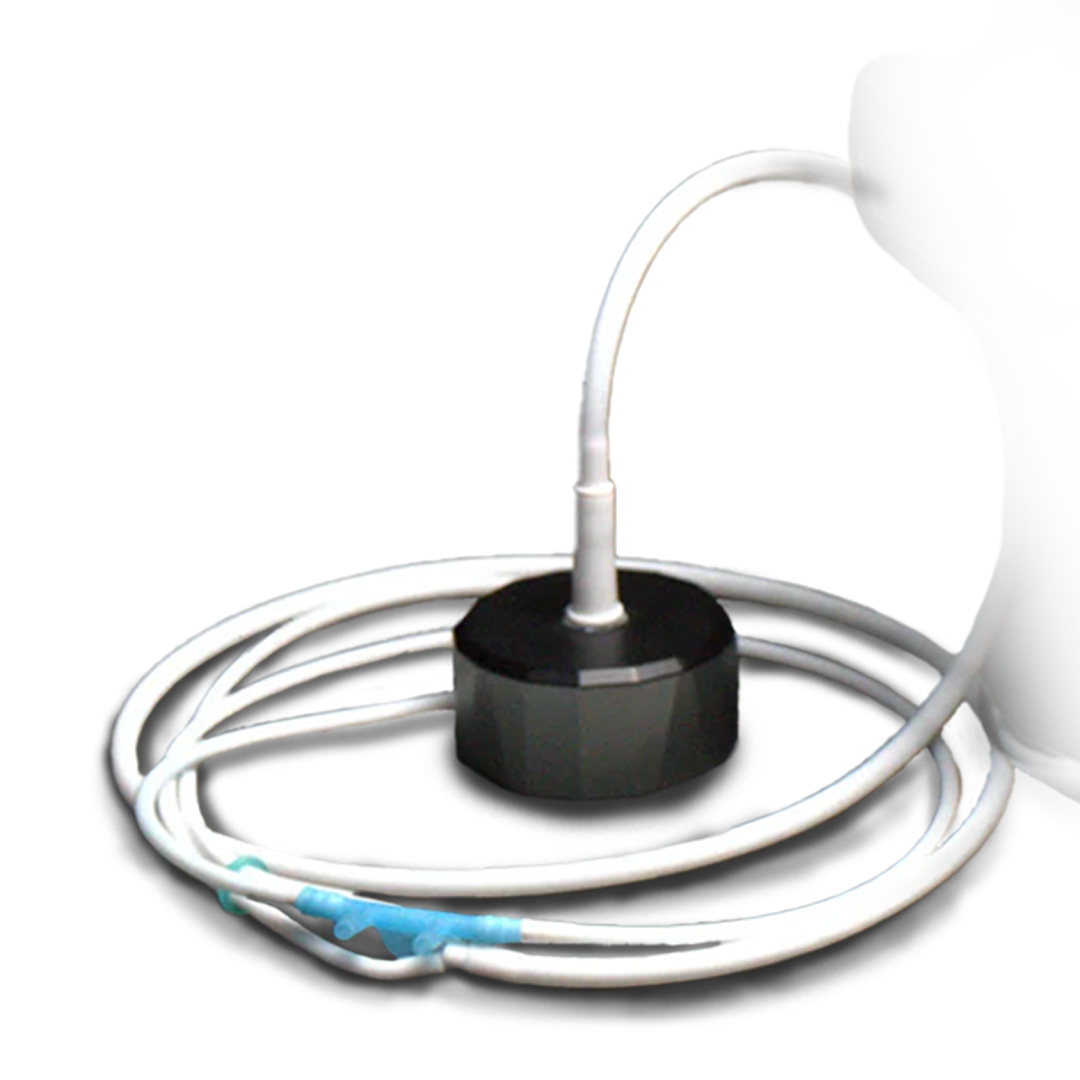
Step Four: Attaching the Goggles
Locate the tubing for the goggles within your starter pack. Attach the tubes to both sides of the goggles, ensuring a tight fit to prevent the gas escaping.
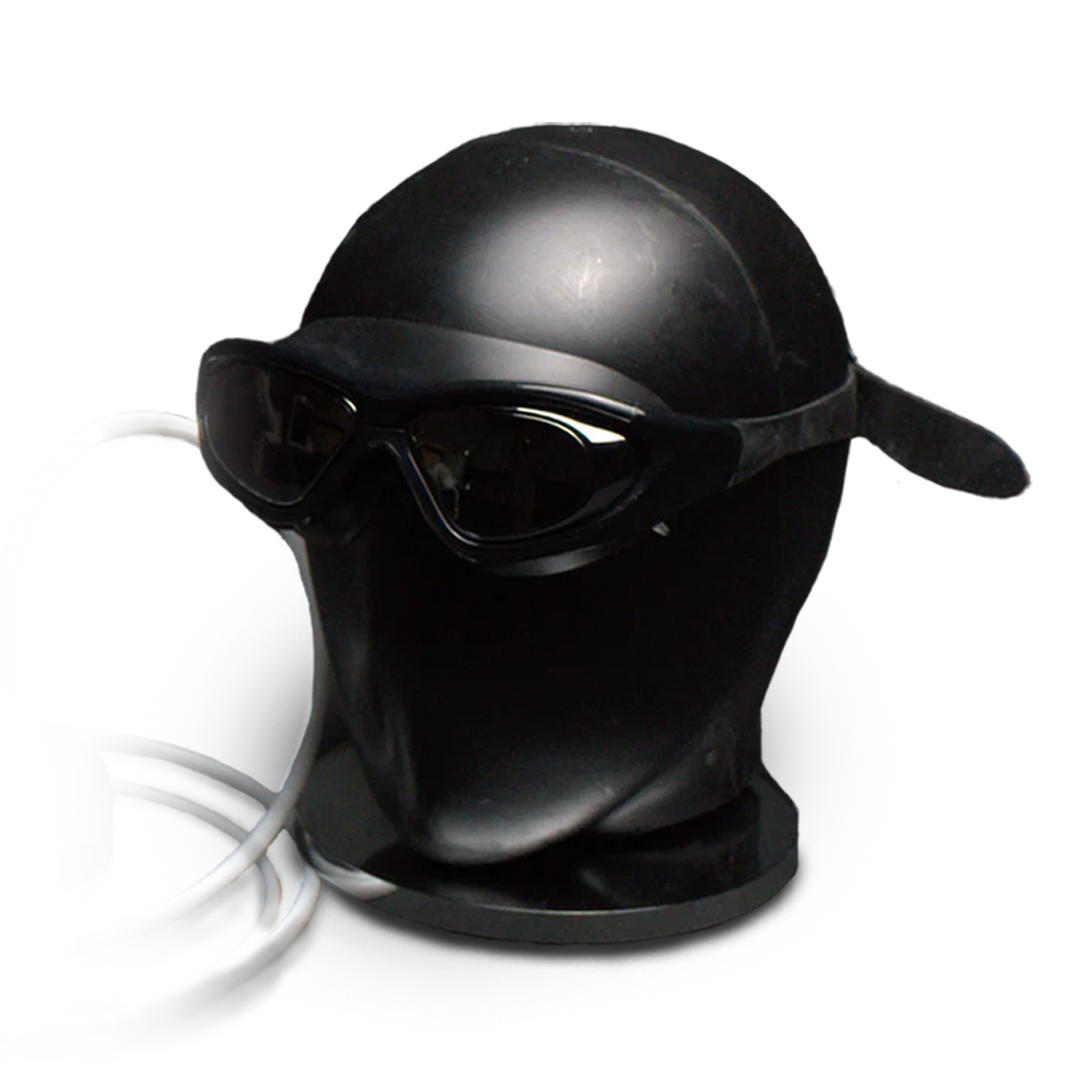
Step Five: Goggle Fitment
Place the goggles over your eyes. Adjust the strap to secure the goggles comfortably on your head, tight enough to stay in place but not so tight as to cause discomfort.
Step Six: Preparation for Use
Settle down in a chair where you can relax. Make sure you are seated comfortably before proceeding to the next step.
Step Seven: Operation
Power on the Hydra-Shot by pressing the start button for 3 to 5 seconds and then release. Tap the button once to begin a 5-minute cycle, or tap twice for a 10-minute cycle.
Step Eight: Session Repetition
After completing one cycle, you may opt to initiate another 5 or 10-minute cycle. For optimal results, allowing your body to absorb hydrogen for an extended period may be beneficial.
Tips for Enhanced Experience
For higher gas production, you might consider shortening the cannula tube to minimize the distance the gas travels.
Ensure that the lid is properly secured and tight to avoid leakage.
Regular use, several times a week, can lead to better results.
Maintenance and Cleaning
Clean the cannula tube with the disinfectant spray from the starter kit. You can soak it briefly or spray and pat it dry, readying it for future uses.
To test for gas production, submerge the end of the cannula in water and look for bubbles. It's normal to see bubbling predominantly from one side.
Usage Precautions
Remove any eyewear such as glasses or contact lenses before using the goggles.
If you are wearing makeup, ensure to cleanse your skin beforehand with a non-toxic soap cleanser.
By following these steps, you can enjoy the full benefits of your Hydra-Shot and give your eyes the attention they deserve. Here's to a rejuvenating experience with your eye health goggles!
How to Use Goggles with the Hydra-Shot from the 4 in One Starter Pack
Transform your eye wellness routine with the innovative Hydra-Shot and its compatibility with specialized goggles found in the 4 in One Starter Pack. Follow this concise guide to use the Hydra-Shot with the inhalation cannula for eye health, and tap into the benefits of hydrogen water right from the comfort of your home.
Step-by-Step Instructions
Step One: Start-Up Process
Begin by reviewing the instructions provided with your Hydra-Shot to initiate the start-up process. Carefully follow the guidelines to ensure the device is ready for operation.
Step Two: Preparing the Hydra-Shot
Switch out the standard lid for the specialized inhalation lid included with your pack. Fill up the Hydra-Shot tank to approximately 80% capacity with distilled water, avoiding overfilling to prevent any leakage.
Step Three: Securing the Inhalation Lid
Affix the inhalation lid onto the Hydra-Shot body, making sure to tighten it securely. The lid should screw on tightly without any misalignment.
Step Four: Attaching the Goggles
Locate the tubing for the goggles within your starter pack. Attach the tubes to both sides of the goggles, ensuring a tight fit to prevent the gas escaping.
Step Five: Goggle Fitment
Place the goggles over your eyes. Adjust the strap to secure the goggles comfortably on your head, tight enough to stay in place but not so tight as to cause discomfort.
Step Six: Preparation for Use
Settle down in a chair where you can relax. Make sure you are seated comfortably before proceeding to the next step.
Step Seven: Operation
Power on the Hydra-Shot by pressing the start button for 3 to 5 seconds and then release. Tap the button once to begin a 5-minute cycle, or tap twice for a 10-minute cycle.
Step Eight: Session Repetition
After completing one cycle, you may opt to initiate another 5 or 10-minute cycle. For optimal results, allowing your body to absorb hydrogen for an extended period may be beneficial.
Tips for Enhanced Experience
For higher gas production, you might consider shortening the cannula tube to minimize the distance the gas travels.
Ensure that the lid is properly secured and tight to avoid leakage.
Regular use, several times a week, can lead to better results.
Maintenance and Cleaning
Clean the cannula tube with the disinfectant spray from the starter kit. You can soak it briefly or spray and pat it dry, readying it for future uses.
To test for gas production, submerge the end of the cannula in water and look for bubbles. It's normal to see bubbling predominantly from one side.
Usage Precautions
Remove any eyewear such as glasses or contact lenses before using the goggles.
If you are wearing makeup, ensure to cleanse your skin beforehand with a non-toxic soap cleanser.
By following these steps, you can enjoy the full benefits of your Hydra-Shot and give your eyes the attention they deserve. Here's to a rejuvenating experience with your eye health goggles!

Customer Support:
Telephone:
(509) 519-2545
Mailing Address:
3019 Duportail St. 217 Richland, Wa 99352